
Management Menu
In this article
- Tree View - Managing the menu structure of your website
- Creating a third level menu
- Manage the File List
This section refers to the "Manage" menu, found when clicking on the DRS logo. The Site Administrator or Site Webmaster role is required to access this menu. This menu contains three sections, the Tree View, the File List and the Access Rights. We have a training video for each one of those sections.
The tree view of your website is the overall structure of your menu and all of its sections and pages. This window also gives you a quick access to change the attributes of pages and sections. You can watch our training on how to manage the tree view here.
- To manage the website's tree view, click on the DRS logo and choose "Manage" from the menu.
- A drop-down menu will appear and then click on "Tree View".
- A window will open with the list of your sections, pages, and floating pages. From there you can:
- Move the order of the pages in a section or move them to a new section:
-
- Set a page as the default page of a section with this icon:

- Make a page float with this icon:
 (floating pages are pages that are not connected to the menu)
 - Manage which Content Manager can manage this page with this icon:

- Restrict the page to logged account only with this icon:

- Restrict the page to chapter members only with this icon:

- Restrict the page to chapter board only with this icon:

- Delete a page with this icon:

- Enable or disable a page with this icon:

If you'd like to expand a menu to a third level, you can attach a page to another page through the Tree View.
- To manage the website's tree, click on the DRS logo and choose "Manage" from the menu.
- A drop-down menu will appear and then click on "Tree View".
- Drag a page and drop it inside the zone of another page to create a third level of menu.
- Click on the reload button to apply your changes.

The DRS Platform has a file manager that allows you to upload documents and images for your website.
Once a file is uploaded, it can be accessed online via the "File List" section of your website.
To manage your file library:
- Click on the DRS logo and choose "Manage" from the menu.
- A drop-down menu will appear and then click on "File List".
- A window will appear with a list of folders and files. You can:
Upload a file: Click on the zone below the file library to upload a file. You can also directly drag and drop files from your computer in this zone.
Reorganize your files: Drag and drop a file to move it to a folder.
To delete a file from the file library: Click on ![]() of the file you want to delete in the "File List".
of the file you want to delete in the "File List".
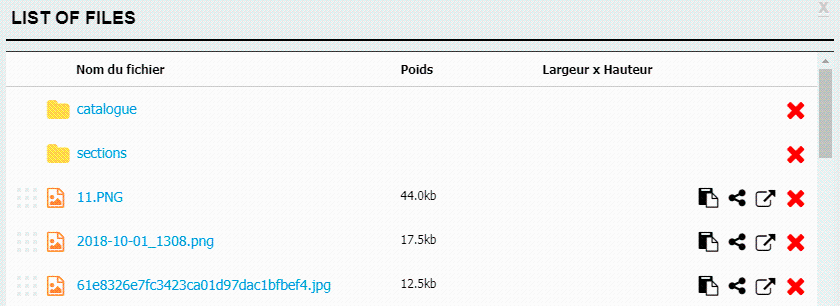
As the files uploaded to the File List are accessible by administrators connected to the site, it is possible to use it as a document sharing platform. Word files can be downloaded from the File List while PDF files open in a web tab.

